How to Properly Reboot or Shut Down a Linux System

 Command Line, How To, Linux  Comments Off on How to Properly Reboot or Shut Down a Linux System
Jul 092015
 

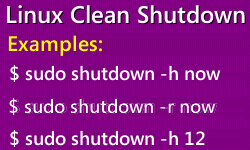
How to do Clean ShutdownLearning how to do a clean shut down of a Linux system is important if you don’t want to mess up your computer.


Just pressing your finger on the power button will certainly shut down or reboot your Linux system. But it can also cause serious damage like data corruption.

Remember, Linux is constantly writing data to disk even if it’s not apparent to you. Also, Linux keeps data in memory although it might appear to have written the data to disk.

So it’s crucial to do an orderly shutdown of a Linux desktop or server.

When you do a clean or orderly shutdown, you’re essentially informing users and processes on the Linux system of the shutdown and blocking new logins.

In this post, we’ll cover various options to properly reboot and shut down a Linux system.

You must be root or use sudo to run the shutdown command.

When I tried to run shutdown without being root or using sudo, I got the following error:

[thomas@localhost ~]$ shutdown
Must be root.

Continue reading »

How to Flush IPTables Chains Selectively

 Command Line, How To, Linux  Comments Off on How to Flush IPTables Chains Selectively
May 132015
 

IPtables are a priceless resource for system administrators to secure their servers.

Given the ceaseless attempt by hackers working for money or thrills, every Linux server administrator must grasp the basics of IPtables.

In this post, I will assume that you already have IPtables installed and running on your system.

Once in a while, there might be arise a situation where you’ll have to flush the IPtables rules.

What is flushing?

Flushing basically refers to deleting the IPtables rules in a single chain or all chains.

Now you should know the difference between flushing and deleting on the command line with reference to IPtables.

In flushing, you’re just deleting the rules in a chain. Continue reading »

How to Find Version of Packages on CentOS

 Command Line, How To, Linux  Comments Off on How to Find Version of Packages on CentOS
May 122015
 

Find Version of Packages on CentOS
Every now and then, there arises the necessity for Linux administrators to find out what version of a particular package is running on a CentOS, RedHat or Fedora system.

As is to be expected, the commands to find out which version of a package is installed on RedHat, CentOS and Fedora are different from the commands for Ubuntu and its derivatives like the popular Linux Mint.

There are multiple ways to get the version of packages installed on CentOS, RedHat and Fedora. You can do it via the command line or through GUI utilities.

In this post, we’ll check out five simple methods to determine package version via the command line.

1. The first command line option that comes to mind when checking for the version of an application or package on CentOS  is yum info package_name.

$ yum info PACKAGE_NAME

Let’s see what version of the clamtk anti-virus software is installed on our CentOS 7 desktop.

$ yum info clamtk
Installed Packages
Name        : clamtk
Arch        : noarch
Version     : 5.15
Release     : 1.el7
Size        : 1.3 M
Repo        : installed

2. The yumdb method provides more information compared to the previous option.

$ yumdb info PACKAGE_NAME

With yumdb info, you not only get the package version number but other details such as checksum of the package (and algorithm used to produce it, such as SHA-256), repository, which user installed it, or whether it landed on the system as a dependency.

Let’s check out the yumdb command with an example.

Why not see what version of python is installed on our Linux system.

$ yumdb info python
python-2.7.5-16.el7.x86_64
     checksum_data = b03c388fe3fe1c711249564c96902852d129a0f4faf8a27accd660bf42ebab4e
     checksum_type = sha256
     from_repo = anaconda
     from_repo_revision = 1404557011
     from_repo_timestamp = 1404557037
     installed_by = 4294967295
     reason = dep
     (and more)

3. There’s another easy to remember option, rpm -qa which queries all currently installed packages.

$ rpm -qa PACKAGE_NAME

One of my favorite newsreaders on Linux is quiterss.

In the below command, we’ll see which version of quiterss is installed. Continue reading »

How To Find CPU Details on Linux

 Command Line, How To  Comments Off on How To Find CPU Details on Linux
Apr 292015
 

Which Processor Running on Linux?The command line interface is so versatile that you can find considerable information about even the hardware side of your Linux server or desktop.
In this post, we’ll take a look at a bunch of commands that provide details about the CPU inside a Linux computer.

We’ll dig down for information on the CPU vendor, check if it’s 32-bit or 64-bit, look for the number of cores, frequency, cache size and more.

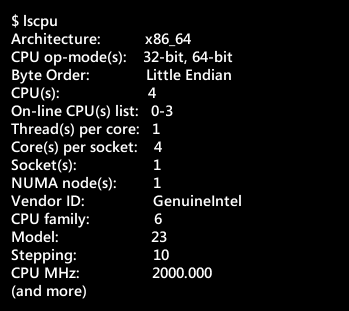
1. Let’s start with lscpu, a favorite of both users and system administrators.

LSCPU Output
A quick glance at the above output tells us that our Linux box has an Intel, quad-core, 64-bit processor running at 2000MHz.

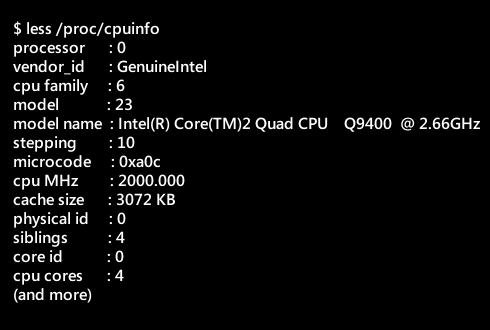
2. Another favorite of system administrators is /proc/cpuinfo.

Use it with the less prefix since the output is big and quickly vanishes beyond the top of the screen.

Using CPUInfo with less

As with the previous command, we see that the output of /proc/cpuinfo provides information about the processor, vendor, cores and frequency.

In the following two examples, we’ll tweak /proc/cpuinfo to get only the information we need.

3. If you’re interested in just knowing the CPU vendor, go with cat /proc/cpuinfo along with with the grep command.

$ cat /proc/cpuinfo | grep vendor | uniq
vendor_id       : GenuineIntel

The output spits out just the vendor name, nothing more.

4. Now that we have the vendor info (above) let’s dig into details of the Intel processor.

$ cat /proc/cpuinfo | grep 'model name' | uniq
model name	: Intel(R) Core(TM)2 Quad CPU    Q9400  @ 2.66GHz

Voila, your PC runs on a Core 2 Quad core Q9400 processor at 2.66GHz. Not the latest and greatest of processors but adequate for most users.

5. Hardinfo is another handy utility that provides a wealth of information about your Linux system.

Although installed on the command line, hardinfo is actually a GTK based GUI utility.

If hardinfo is not installed on your Linux box, you can do so with the following command on your Ubuntu system.

$ sudo apt-get install hardinfo

If you ask me, hardinfo is an embarras de richesses. Besides the CPU, it provides details on most aspects of the Linux box including memory, storage, PCI devices, storage, USB devices etc plus information on the OS, kernel, and networking.

An extremely handy tool, hardinfo also lets you quickly generate a HTML report that you can save to your machine.

I cannot recommend hardinfo strongly enough. Continue reading »

What are PPAs and How to Add Latest Software via PPAs

 Apps, How To, Linux  Comments Off on What are PPAs and How to Add Latest Software via PPAs
Mar 182015
 

If you’re a newcomer to Ubuntu (or its derivatives like Linux Mint), you’re probably keen on installing and trying out the latest, greatest and hottest applications available in the open source universe.

Unfortunately, a lot of new applications are not available through the official Ubuntu or Linux Mint repositories.

So you’ll have to download and install the software on your own and install them via the dpkg or gdebi tools.

Or you can install and update them on your Ubuntu PC via the Personal Package Archive (PPA).

What is a PPA?

Unique to the Ubuntu universe, PPAs are special software repositories from the developer community that let users install software via the familiar apt-get install technique. Or if you prefer, via the GUI method.

Here’s how you add a PPA to your Ubuntu PC. You can get the PPA’s name of an application on the developer’s web site or by searching for it on LaunchPad.

Open a terminal and type:

# sudo add-apt-repository ppa:user/ppa-name

Let’s consider a concrete example where we’ll add a PPA and then install an application from that PPA.

For instance, I wanted to try out a new note application called Papyrus that debuted a couple of days back. The spanking new application was not available in the official repositories.

So I decided to take the PPA road.

1. First I added Papyrus PPA to my PC.

I found a link to the Papyrus PPA on the developer’s web site and got its name.

# sudo add-apt-repository ppa:aseman/desktop-apps
[sudo] password for jason: 
You are about to add the following PPA to your system:
 Desktop Applications of the Aseman Team
 More info: https://launchpad.net/~aseman/+archive/ubuntu/desktop-apps
Press [ENTER] to continue or ctrl-c to cancel adding it

Executing: gpg --ignore-time-conflict --no-options --no-default-keyring --homedir /tmp/tmp.kjY0IqUMJp --no-auto-check-trustdb --trust-model always --keyring /etc/apt/trusted.gpg --primary-keyring /etc/apt/trusted.gpg --keyserver hkp://keyserver.ubuntu.com:80 --recv-keys C117080D
gpg: requesting key C117080D from hkp server keyserver.ubuntu.com
gpg: key C117080D: public key "Launchpad PPA for Aseman" imported
gpg: Total number processed: 1
gpg:               imported: 1  (RSA: 1)

If you’re not comfortable with the command line, you can take the GUI route to add a PPA.

In Linux Mint, you can add a PPA via the GUI option by navigating to Menu –>Administration–>Software Sources–>PPAs and then clicking on the Add a new PPA button.

If you’re running Ubuntu, you must head over to Ubuntu Software Center–>Edit–>Software Sources–>Other Software–>Add. Then type in the PPA address and click on the Add Source button. Now when you search for the application in the Software Center, you’ll find it there.

2. If you’ve added a PPA via the terminal, it’s now time to update the list of available packages and their versions.

# sudo apt-get update

3. Now look for the Papyrus software through apt-cache search search_string tool.

# apt-cache search papyrus
papyrus - Papyrus modern note manager
libpapyrus3-dev - DICOM compatible file format library

After the PPA is added, you can also search for Papyrus in the Software Manager (Linux Mint) or Software Center (Ubuntu).

If you’re in a hurry and know the name of the application, you can skip this step.

4. The final step is to install the Papyrus application on your computer.

# sudo apt-get install papyrus
Reading package lists... Done
Building dependency tree       
Reading state information... Done
The following extra packages will be installed:
  dconf-cli dconf-editor dconf-tools libX11-dev libc-dev-bin libc6-dev
  libdrm-dev libegl1-mesa-dev libgl1-mesa-dev libgles2-mesa-dev
  ....

If you prefer the GUI route, you can install Papyrus via the Software Manager (Linux Mint) or Software Center (Ubuntu).

Removing PPAs

There’s always the chance that you might want to remove a PPA that you’ve installed on your Ubuntu system.

So how do you remove a PPA from your Ubuntu PC? Continue reading »

Linux Software Installation Made Easy

 Command Line, How To, Linux  Comments Off on Linux Software Installation Made Easy
Mar 122015
 

Don’t let Windows or Mac users scare you that adding or removing software on a Linux computer is only for bravehearts.

Installing, upgrading or removing software on Linux systems is no longer the daunting chore it used to be some years back.

Broadly speaking, there are two ways to install software packages on a Linux system.

You can install software packages either through a graphical user interface (GUI) or do it via the command line.

Major desktop Linux distros like Fedora Workstation 21, Linux Mint and Ubuntu now have slick GUIs that make searching for and installing new software a breeze.

The big advantage with GUI based installers is that they take care of dependency resolution so newbies won’t have to fret whether the package they’re installing or upgrading will work without having to install other software.

But you can be sure that hardcore Linux enthusiasts and system administrators will always opt for the command line to install, upgrade or remove software.

In large business environments (such as a web hosting companies) where headless servers are often the norm, Linux system administrators work exclusively on the command line.

Command Line Installation

On the command line, two kinds of tools (low level and high level) are available to install software packages on a Linux system.

The first method (dpkg for Debian and rpm for Red Hat) does not resolve dependencies and are therefore considered low level tools.

The high level installation tools (apt-get or yum) take care of dependencies.

In case you didn’t know, dependencies are other software that an application requires before it can work.

dpkg and rpm are low-level tools while apt-get and yum are considered high-level tools because they take care of dependencies as part of the installation process.

In this post, we’ll look at installing and removing software packages on both Debian based distributions and Red Hat style distros (like Fedora, CentOS and OpenSUSE that follow the Red Hat methodology) via the command line.

As you no doubt guessed, the commands for Debian and Red hat are completely different.

So we’ll have to consider them separately to avoid confusion.

We’ll consider Debian and its derivative distros first.

Installation on Debian

Commands mentioned in this section should work on Debian, Ubuntu, Linux Mint, Xandros and more.

Install a Package

Linux users opt for dpkg with software that are not downloaded from a repository.

Here’s how you install a package with dpkg.

# dpkg -i package_name

When you install a .deb package via the low-level dpkg tool, be aware that there is no dependency resolution.

So if the package you’re installing requires other software you’re stuck.

To avoid dependency issues, you must use higher-level tools like apt-get to install software on Debian and its derivatives. Strictly speaking, this is not always possible because not all packages are in repositories.

When you use the high level apt-get install tool, you’re downloading software from a repository.

The first step is to run update and then search for the package you’re interested in.

# apt-get update
# apt-cache search search_string

If you’re looking for an RSS reader, you’d run the below command first.

# apt-cache search rss

That’s how I discovered RSS readers like Quiterss and Liferea.

Finally, when you’ve found the package you want just install it with the following command.

You can skip the search step if you already know the package you want to install.

# apt-get install package_name
List Packages Installed

Your Ubuntu or Linux Mint computer has dozens of packages installed on it.

If you want the entire lengthy list, go with the following command.

$ dpkg -l

I recommend you save the output to a text file for leisurely analysis later.

$ dpkg -l > MyPackageList.txt
Total Packages Installed

Say you want to find out how many packages are installed on a Linux system without the long list of all the individual packages.

You use the dpkg with the -l option and then pipe it to wc -l.

On my Ubuntu system, I was curious about the total packages installed.

Here’s what I did:

$ dpkg -l | wc -l
2215
Remove a Package

Removing a package on a Debian, Ubuntu or Linux Mint computer is no sweat with the below command.

# dpkg -r package_name

Alternatively, if it’s a package downloaded from a repository you should go with either of the following commands.

# apt-cache remove package_name

But the above command leaves behind configuration files.

If your goal is to remove the configuration files too, you must use the purge option.

apt-cache purge package_name
Information About a Specific Package

If you’re looking for more information on a specific package, what command would you run?

In the below example, I sought information on the popular Cherrytree notes application.

$ dpkg -l cherrytree | tail -1 | tr -s ' '
ii cherrytree 0.35.7-1~ppa1~trusty1 all hierarchical note taking application
Verify if Package is Installed

You can check if a particular software package is installed on your Debian or Ubuntu computer.

Say you want to see if an rss package is installed on your Ubuntu computer.

Here’s the command you ought to run:

$ dpkg -l | grep rss
ii  quiterss  0.17.6-0ubuntu1~trusty  amd64 RSS/Atom feed reader written on Qt

If quiterss weren’t installed on my Ubuntu PC, I wouldn’t have got any response.

Red Hat & Red Hat Syle Distros

Let’s now take a dekko at how to install software on Red Hat and its derivative distributions like CentOS and Fedora.

Red Hat is the favorite Linux distro for scores of large corporations around the world. Continue reading »