GRE VPN Tunnel Configuration

 Networking, Security  Comments Off on GRE VPN Tunnel Configuration
May 172022
 

Since Generic Routing Encapsulation (GRE) VPN tunnels continue to remain on Cisco exams like CCNA and CCNP ENCOR, let’s demonstrate a quick configuration of a GRE tunnel.

Why do we care about GRE?

We care about GRE because it can encapsulate diverse network layer protocols that can be transported over an IP network between two locations over a public network like the Internet.

GRE can be used with or for:
* Multicast packets, such as OSPF, EIGRP, and streaming applications
* Connecting IPv6 networks over IPv4 networks

For purposes of this demonstration, we used the GNS3 emulation software running on a Linux VM.

The biggest problem with default GRE configuration (like the one below) is that it does not include security.
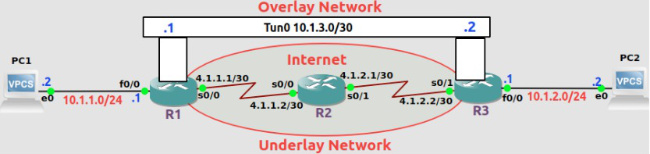
GRE Tunnel Configuration

! Configure PC1
ip 10.1.1.2/24 10.1.1.1
save
! Configure PC2
ip 10.1.2.2/24 10.1.2.1
save

! Configure Router R1
conf t
hostname R1
interface f0/0
ip address 10.1.1.1 255.255.255.0
no shut
interface s0/0
ip address 4.1.1.1 255.255.255.252
no shut
! Configure Router R2
conf t
hostname R2
interface s0/1
ip address 4.1.1.2 255.255.255.252
no shut
int s0/0
ip address 4.1.2.1 255.255.255.252
no shut
! Configure Router R3
conf t
hostname R3
interface s0/1
ip address 4.1.2.2 255.255.255.252
no shut
interface f0/0
ip address 10.1.2.1 255.255.255.0
no shut

Static Routing
We’ll use static routing for end-to-end connectivity.

! Configure Static Routing on R1 & R3
!R1
conf t
ip route 0.0.0.0 0.0.0.0 4.1.1.2
!R3
conf t
ip route 0.0.0.0 0.0.0.0 4.1.2.1

GRE Tunnel Interfaces
Now it’s time to configure the GRE tunnel.

! Configure GRE Tunnel on R1
conf t
int tun 0
ip address 10.1.3.1 255.255.255.252
tunnel mode gre ip
tunnel source s0/0
tunnel destination 4.1.2.2

! Configure GRE Tunnel on R3
conf t
int tun 0
ip address 10.1.3.2 255.255.255.252
tunnel mode gre ip
tunnel source s0/1
tunnel destination 4.1.1.1

Let’s check the Tunnel Interfaces on R1 and R3 to make sure they’re up.

Verify Tunnel Interfaces
R1#sh ip int br
Interface IP-Address OK? Method Status Protocol
FastEthernet0/0 10.1.1.1 YES NVRAM up up
Serial0/0 4.1.1.1 YES NVRAM up up
FastEthernet0/1 unassigned YES NVRAM administratively down down
Serial0/1 unassigned YES NVRAM administratively down down
Serial0/2 unassigned YES NVRAM administratively down down
Serial0/3 unassigned YES NVRAM administratively down down
FastEthernet1/0 unassigned YES NVRAM administratively down down
FastEthernet2/0 unassigned YES NVRAM administratively down down
Tunnel0 10.1.3.1 YES NVRAM up up

R3#sh ip int br
Interface IP-Address OK? Method Status Protocol
FastEthernet0/0 10.1.2.1 YES NVRAM up up
Serial0/0 unassigned YES NVRAM administratively down down
FastEthernet0/1 unassigned YES NVRAM administratively down down
Serial0/1 4.1.2.2 YES NVRAM up up
Serial0/2 unassigned YES NVRAM administratively down down
Serial0/3 unassigned YES NVRAM administratively down down
FastEthernet1/0 unassigned YES NVRAM administratively down down
FastEthernet2/0 unassigned YES NVRAM administratively down down
Tunnel0 10.1.3.2 YES NVRAM up up
R3#

Configure EIGRP Routing on Tunnel Interfaces R1 and R3
! R1
conf t
router eigrp 100
network 10.0.0.0
no auto-summary

! R3
conf t
router eigrp 100
network 10.0.0.0
no auto-summary

Verify Routing on R1 and R3
R1#sh ip route
Codes: C – connected, S – static, R – RIP, M – mobile, B – BGP
D – EIGRP, EX – EIGRP external, O – OSPF, IA – OSPF inter area
N1 – OSPF NSSA external type 1, N2 – OSPF NSSA external type 2
E1 – OSPF external type 1, E2 – OSPF external type 2
i – IS-IS, su – IS-IS summary, L1 – IS-IS level-1, L2 – IS-IS level-2
ia – IS-IS inter area, * – candidate default, U – per-user static route
o – ODR, P – periodic downloaded static route

Gateway of last resort is 4.1.1.2 to network 0.0.0.0

4.0.0.0/30 is subnetted, 1 subnets
C 4.1.1.0 is directly connected, Serial0/0
10.0.0.0/8 is variably subnetted, 3 subnets, 2 masks
C 10.1.3.0/30 is directly connected, Tunnel0
D 10.1.2.0/24 [90/297270016] via 10.1.3.2, 00:21:00, Tunnel0
C 10.1.1.0/24 is directly connected, FastEthernet0/0
S* 0.0.0.0/0 [1/0] via 4.1.1.2
R1#

R3#sh ip route
Codes: C – connected, S – static, R – RIP, M – mobile, B – BGP
D – EIGRP, EX – EIGRP external, O – OSPF, IA – OSPF inter area
N1 – OSPF NSSA external type 1, N2 – OSPF NSSA external type 2
E1 – OSPF external type 1, E2 – OSPF external type 2
i – IS-IS, su – IS-IS summary, L1 – IS-IS level-1, L2 – IS-IS level-2
ia – IS-IS inter area, * – candidate default, U – per-user static route
o – ODR, P – periodic downloaded static route

Gateway of last resort is 4.1.2.1 to network 0.0.0.0

4.0.0.0/30 is subnetted, 1 subnets
C 4.1.2.0 is directly connected, Serial0/1
10.0.0.0/8 is variably subnetted, 3 subnets, 2 masks
C 10.1.3.0/30 is directly connected, Tunnel0
C 10.1.2.0/24 is directly connected, FastEthernet0/0
D 10.1.1.0/24 [90/297270016] via 10.1.3.1, 00:21:28, Tunnel0
S* 0.0.0.0/0 [1/0] via 4.1.2.1
R3#

Verify GRE
Now that we have configured the GRE VPN tunnel, let’s run some Verify commands on Routers R1 and R3.

We’ll start by verifying the tunnel0 interface on R1.

R1#show interface tunnel0
Tunnel0 is up, line protocol is up
Hardware is Tunnel
Internet address is 10.1.3.1/30
MTU 1514 bytes, BW 9 Kbit/sec, DLY 500000 usec,
reliability 255/255, txload 1/255, rxload 1/255
Encapsulation TUNNEL, loopback not set
Keepalive not set
Tunnel source 4.1.1.1 (Serial0/0), destination 4.1.2.2
Tunnel protocol/transport GRE/IP
Key disabled, sequencing disabled
Checksumming of packets disabled
Tunnel TTL 255
Fast tunneling enabled
Tunnel transmit bandwidth 8000 (kbps)
Tunnel receive bandwidth 8000 (kbps)
Last input 00:00:03, output 00:00:01, output hang never
Last clearing of “show interface” counters never
Input queue: 0/75/0/0 (size/max/drops/flushes); Total output drops: 0
Queueing strategy: fifo
Output queue: 0/0 (size/max)
5 minute input rate 0 bits/sec, 0 packets/sec
5 minute output rate 0 bits/sec, 0 packets/sec
302 packets input, 25344 bytes, 0 no buffer
Received 0 broadcasts, 0 runts, 0 giants, 0 throttles
0 input errors, 0 CRC, 0 frame, 0 overrun, 0 ignored, 0 abort
302 packets output, 25364 bytes, 0 underruns
0 output errors, 0 collisions, 0 interface resets
0 unknown protocol drops
0 output buffer failures, 0 output buffers swapped out
R1#

Let’s check the tunnel interface on router R3 now.

R3#show interface tunnel0
Tunnel0 is up, line protocol is up
Hardware is Tunnel
Internet address is 10.1.3.2/30
MTU 1514 bytes, BW 9 Kbit/sec, DLY 500000 usec,
reliability 255/255, txload 1/255, rxload 1/255
Encapsulation TUNNEL, loopback not set
Keepalive not set
Tunnel source 4.1.2.2 (Serial0/1), destination 4.1.1.1
Tunnel protocol/transport GRE/IP
Key disabled, sequencing disabled
Checksumming of packets disabled
Tunnel TTL 255
Fast tunneling enabled
Tunnel transmit bandwidth 8000 (kbps)
Tunnel receive bandwidth 8000 (kbps)
Last input 00:00:03, output 00:00:04, output hang never
Last clearing of “show interface” counters never
Input queue: 0/75/0/0 (size/max/drops/flushes); Total output drops: 0
Queueing strategy: fifo
Output queue: 0/0 (size/max)
5 minute input rate 0 bits/sec, 0 packets/sec
5 minute output rate 0 bits/sec, 0 packets/sec
316 packets input, 26540 bytes, 0 no buffer
Received 0 broadcasts, 0 runts, 0 giants, 0 throttles
0 input errors, 0 CRC, 0 frame, 0 overrun, 0 ignored, 0 abort
318 packets output, 26688 bytes, 0 underruns
0 output errors, 0 collisions, 0 interface resets
0 unknown protocol drops
0 output buffer failures, 0 output buffers swapped out

We can verify that the GRE tunnel is working fine by running traceroute on R1 and R3.

R1#traceroute 10.1.2.1
Type escape sequence to abort.
Tracing the route to 10.1.2.1
1 10.1.3.2 8 msec 0 msec 0 msec

We can see that the packet is moving through the tunnel interface.

R3#traceroute 10.1.1.1
Type escape sequence to abort.
Tracing the route to 10.1.1.1
1 10.1.3.1 4 msec 4 msec 0 msec

Troubleshooting GRE
* Tunnel Interface IP addresses on either side must be in same subnet
* Subnet masks on both sides of the tunnel must match
* Check if interfaces for tunnel source/destination are configured with correct IP address
* Check if Tunnel interfaces are up
* Verify if static or dynamic routing is configured properly

Adding Security to GRE via IPSec
The biggest drawback of GRE is that GRE by itself does not provide security.

So we leverage IPSec to strengthen GRE.

In a following blog post, we’ll demonstrate GRE with IPSec.

CCNA 200-301 Practice Exam 1

 Networking  Comments Off on CCNA 200-301 Practice Exam 1
Jul 192020
 

CCNA Test – 75 Questions

1) What is the configuration register that ignores the startup configuration file?
A. 0x4142
B. 0x4214
C. 0x2142
D. 0x2123
E. 0x4212

2) Where does RIPv2 send its routing updates?
A. 127.0.0.0
B. 224.0.0.10
C. 255.255.255.255
D. 224.0.0.9
E. 255.255.255.254

EIGRP Network Topology Diagram

3) Identify two Link-State protocols:
A. EIGRP
B. BGP
C. OSPv3
D. RIPv2
E. IS-IS

4) Identify the Network class of IPv4 address 224.0.0.6
A. Class C
B. Multicast
C. Class B
D. Classless
E. Loopback

5) What is DHCP?
A. Dynamic Hot Convergence Protocol used to overcome limitations of Static Routing
B. Dynamic Hypervisor Convergence Protocol
C. A feature of Hubs and Bridges
D. Physical Layer Protocol
E. Enables allotment of IP addresses, subnetmasks, default gateway, etc., to hosts

6) What is Cisco License Manager?
A. Legally purchased software for Cisco 2901 routers
B. Free downloadable application to manage Cisco hubs, switches and routers
C. Free software from Cisco to deploy Cisco software licenses
D. 30-Day trial software for Cisco software
E. Annual subscription plan for Cisco software Continue reading »

How to Install Packet Tracer Networking Simulator on Linux

 How To, Linux, Networking  Comments Off on How to Install Packet Tracer Networking Simulator on Linux
Mar 312019
 

For anyone starting on the rewarding journey into computer networking, Packet Tracer is an indispensable learning tool.

If you’re planning to take the Cisco Certified Network Associate (CCNA) ) exam, you must practice on the Packet Tracer networking simulation software from Cisco.

Packet Tracer

Download Packet Tracer

On Cisco’s Networking Academy web site, the latest 64-bit version of Packet Tracer is available for both Linux and Windows for free.

So I headed to Cisco’s Packet Tracer Download web site and downloaded the Packet Tracer 7.2.1 tarball for Linux.

Before you can download Packet Tracer, you must register with the site.

For the purpose of this post, I downloaded Packet Tracer 7.2 to a 10-year-old Dell 780 desktop PC running Linux Mint 18.3.

(By the way, I tried the Windows version of Packet Tracer too and got it to work without sweat. Since my Windows 10 laptop is an anemic device with just 4GB RAM, I prefer to run Packet Tracer on my Linux PC, which has a more generous 8GB RAM.)

Extracting the File

I extracted Packet Tracer 7.2.1 into the same folder in which I had downloaded the file.

Now that you have downloaded the Packet Tracer software, fire up your terminal and extract the software (see command below).

mike@familypc ~/Downloads/Packet-Tracer $ tar -xvzf Packet-Tracer-7.2.1-for-Linux-64-bit.tar.gz
art/
art/IoE/
art/IoE/Sensors/
art/IoE/Sensors/MotionSensor.png
art/IoE/Sensors/GenericSensor.png
[output truncated]
templates/Smart LED.ptd
tpl.linguist
tpl.packettracer
mike@familypc ~/Downloads/Packet-Tracer

Now that we completed the extraction, let’s take a quick look at the folder.

mike@familypc ~/Downloads/Packet-Tracer $ ll -a
total 305296
drwxrwxr-x 11 mike mike      4096 Mar 29 20:11 ./
drwxr-xr-x 18 mike mike      4096 Mar 24 16:19 ../
-rw-rw-r--  1 mike mike    710787 Mar 26 22:19 1.2.4.4 Packet Tracer - Help and Navigation Tips.pdf
drwxrwxr-x 24 mike mike      4096 Dec  9 23:45 art/
drwxrwxr-x  6 mike mike      4096 Dec  9 23:45 backgrounds/
drwxr-xr-x  8 mike mike      4096 Dec  7 15:41 bin/
-rw-rw-r--  1 mike mike    172942 Mar 17 17:31 Cisco Packet Tracer FAQs.pdf
-rwxrwxr-x  1 mike mike     14510 Dec 14 20:23 eula721.txt*
drwxr-xr-x 15 mike mike      4096 Dec 10 18:44 extensions/
drwxr-xr-x  3 mike mike      4096 Dec  7 15:27 help/
-rwxr-xr-x  1 mike mike      4134 Dec 14 19:56 install*
drwxrwxr-x  2 mike mike      4096 Dec  9 23:45 languages/
-rw-rw-r--  1 mike mike 311645539 Mar 17 17:31 Packet-Tracer-7.2.1-for-Linux-64-bit.tar.gz
dr-xr-xr-x 21 mike mike      4096 Dec  9 23:45 saves/
-rw-r--r--  1 mike mike      1237 Dec  9 23:45 set_ptenv.sh
-rw-r--r--  1 mike mike      1207 Dec  9 23:45 set_qtenv.sh
drwxrwxr-x  2 mike mike      4096 Dec  9 23:45 Sounds/
drwxrwxr-x  3 mike mike      4096 Dec  9 23:45 templates/
-rw-r--r--  1 mike mike       159 Mar  5  2018 tpl.linguist
-rw-r--r--  1 mike mike       177 Dec  7 15:40 tpl.packettracer
mike@familypc ~/Downloads/Packet-Tracer $

Everything looks good.

So let’s move to the next step: Running the install script.

Installing Packet Tracer

I did not encounter any major issues in installing Packet Tracer except for a minor bump when the process stopped momentarily and asked for my sudo password to copy the files into opt/pt.

mike@familypc ~/Downloads/Packet-Tracer $ ./install

Welcome to Cisco Packet Tracer 7.2.1 Installation

Read the following End User License Agreement "EULA" carefully. You must accept the terms of this EULA to install and use Cisco Packet Tracer.
Press the Enter key to read the EULA.

Cisco Packet Tracer
Software License Agreement

IMPORTANT: PLEASE READ THIS CISCO PACKET TRACER SOFTWARE LICENSE AGREEMENT (THE "AGREEMENT") CAREFULLY.  DOWNLOADING, INSTALLING OR USING THE CISCO PACKET TRACER SOFTWARE CONSTITUTES ACCEPTANCE OF T
HIS AGREEMENT.  IF YOU DO NOT AGREE TO ALL OF THE TERMS OF THIS AGREEMENT, THEN CISCO SYSTEMS, INC. ("CISCO") IS UNWILLING TO LICENSE THE SOFTWARE TO YOU AND YOU ARE NOT AUTHORIZED TO DOWNLOAD, INST
ALL OR USE THE SOFTWARE.
I.	DISTRIBUTION RIGHTS.  The terms in this Section I (Distribution Rights) of the Agreement apply solely to any Cisco Networking Academy instructor, administrator or other person or entity approved in writing by Cisco Systems, Inc. (each, an "Instructor") to distribute and use the Cisco Packet Tracer software and related documentation (collectively, the "Software") in accordance with the terms and conditions of this Agreement.
	[output truncated]
Cisco, Cisco Systems, and the Cisco Systems logo are registered trademarks of Cisco Systems, Inc. in the U.S. and certain other countries.  Any other trademarks mentioned in this document are the property of their respective owners.
Do you accept the terms of the EULA? (Y)es/(N)o

yes
You have accepted the terms to the EULA. Congratulations. Packet Tracer will now be installed.
Enter location to install Cisco Packet Tracer or press enter for default [/opt/pt]: 
Installing into /opt/pt

Not able to create and copy files to /opt/pt
Should we try to gain root access with sudo? [Yn] y
[sudo] password for mike: 
Installing into /opt/pt
Copied all files successfully to /opt/pt

Should we create a symbolic link "packettracer" in /usr/local/bin for easy Cisco Packet Tracer startup? [Yn] y
Type "packettracer" in a terminal to start Cisco Packet Tracer
Writing PT7HOME environment variable to /etc/profile
Writing QT_DEVICE_PIXEL_RATIO environment variable to /etc/profile

Cisco Packet Tracer 7.2.1 installed successfully
Please restart you computer for the Packet Tracer settings to take effect

Voila, Packet Tracer 7.2 is now installed on my Linux Mint PC.

After rebooting the system, I was able to launch Packet Tracer and get it to work without any issues.

To launch Packet Tracer, head to the terminal and just issue the command packettracer:

mike@familypc ~ $ packettracer
Starting Packet Tracer 7.2.1

But if you’re like me and want to do more with less, you can set up an alias by opening the .bashrc file with nano or vim and inserting alias pt=”packettracer” at the end of the file, save and close it. Don’t forget to run source ~/.bashrc so that you don’t have to close the terminal for the new alias to work. The next time you want to launch Packet Tracer, just type pt instead of the longer packettracer on the terminal.

Overall, I did not encounter any showstoppers in the process of downloading, installing or using Packet Tracer 7.2.1 on my Linux PC.

As you can see from the Packet Tracer image at the top of this post, I even moved a PC and switch into the logical work area and hooked them up with a console/rollover cable.

Getting Packet Tracer 7.2 on my Linux desktop PC took about five-minutes.

Since Linux Mint is based on Ubuntu, Packet Tracer should work on Ubuntu too.

One of these days, I’ll test Packet Tracer on my CentOS 7 desktop and see how the process goes.