14 Methods to Verify If You’re Running Red Hat 9 OS

 Command Line, Linux  Comments Off on 14 Methods to Verify If You’re Running Red Hat 9 OS
Sep 032022
 

Red Hat Enterprise Linux 9 (RHEL 9) is the latest iteration of the solid Linux OS that powers thousands of Linux servers and workstations at a gazillion companies and organizations worldwide.

So how to quickly verify if the version of Red Hat Enterprise Linux OS you’re running is the latest release, i.e., RHEL 9 aka plow?

There are several ways to confirm if your server has the latest version of the Red Hat OS, i.e., RHEL 9.

Most of the methods do not require sudo (elevated) permission and can be run by all users.

Verify RHEL OS: Many Options

Let’s consider at least 14 ways to verify if your Red Hat workstation or server is running Red Hat Enterprise Linux 9 (RHEL 9).

By the way, all the options below should work well with previous versions of Red Hat OS like RHEL 7 or RHEL 8 as well as CentOS, Rocky Linux and AlmaLinux.

Option 1: Old is Gold
There is one crisp and neat CLI command that’s been providing the answer to the version of Red Hat OS on your server for over 20 years.

That command is cat /etc/redhat-release and it’s been available on RHEL 5, 6, 7, 8 and now on RHEL 9.

$ cat /etc/redhat-release
Red Hat Enterprise Linux release 9.0 (Plow)

Option 2: Via Subscription Manager
The subscription-manager option requires you to have registered your system with Red Hat and also needs administrator privileges.

So what is the Red Hat Subscription Manager?

According to the Red Hat 9 OS man pages, subscription-manager “is a client program that registers a system with a subscription management service such as the Customer Portal Subscription Management service or on-premise Subscription Asset.”

Besides the version of Red Hat OS, the output of sudo subscription-manager facts gives you a ton of other information including CPU, kernel, bios, motherboard and memory.

Since the output is long, I’ve truncated it so you won’t be able to see most of the other information.

$ sudo subscription-manager facts
cpu.core(s)_per_socket: 4
cpu.cpu(s): 8
cpu.cpu_socket(s): 1
cpu.thread(s)_per_core: 2
cpu.topology_source: kernel /sys cpu sibling lists
distribution.id: Plow
distribution.name: Red Hat Enterprise Linux
distribution.version: 9.0
…..[Output Truncated]

Option 3: hostnamectl
hostctl is an elegant CLI command that outputs more than just the Red Hat OS version your system is running.

This command also provides information on the system hardware, kernel, CPU architecture, and Machine and Boot IDs.

Take a look below:

[jack@localhost ~]$ hostnamectl
Static hostname: n/a
Transient hostname: localhost
Icon name: computer-desktop
Chassis: desktop 🖥
Machine ID: 34cbcd014bc4485799485d4322d9d700
Boot ID: aff0229c0ce940c5882014ce732cf194
Operating System: Red Hat Enterprise Linux 9.0 (Plow)
CPE OS Name: cpe:/o:redhat:enterprise_linux:9::baseos
Kernel: Linux 5.14.0-70.22.1.el9_0.x86_64
Architecture: x86-64
Hardware Vendor: Dell Inc.
Hardware Model: OptiPlex 9020

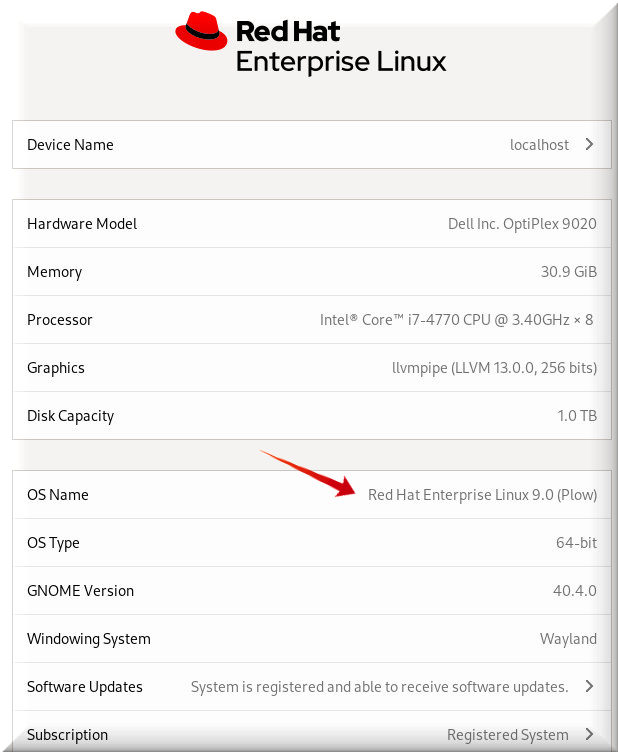
Option 4: Via Gnome Control Center
Our fourth option, gnome-control-center, is actually a combination of CLI and GUI.

You start with the CLI and the output comes in the form of a GUI.

$ gnome-control-center

RHEL Gnome Control Center

Option 5: RPM Commands
Let’s now consider a couple of rpm methods to verify the Red Hat release on your server or workstation.

The first method is running a rpm –query:

$ rpm --query redhat-release
redhat-release-9.0-2.17.el9.x86_64

Option 6: Another RPM Method
Here’s another rpm way to confirm your RHEL OS version.

This rpm method provides a super-brief answer.

$ rpm -E %{rhel}
9

Option 7: Yet Another cat command
It seems like there’s no end to what you can do with cat, right?

$ cat /etc/os-release
NAME=”Red Hat Enterprise Linux”
VERSION=”9.0 (Plow)
ID=”rhel”
ID_LIKE=”fedora”
VERSION_ID=”9.0
PLATFORM_ID=”platform:el9″
PRETTY_NAME=”Red Hat Enterprise Linux 9.0 (Plow)”
ANSI_COLOR=”0;31″
LOGO=”fedora-logo-icon”
CPE_NAME=”cpe:/o:redhat:enterprise_linux:9::baseos”
HOME_URL=”https://www.redhat.com/”
DOCUMENTATION_URL=”https://access.redhat.com/documentation/red_hat_enterprise_linux/9/”
BUG_REPORT_URL=”https://bugzilla.redhat.com/”

Option 8: More the Merrier
The below More command gets to the point quickly.

$ more /etc/redhat-release
Red Hat Enterprise Linux release 9.0 (Plow)

Option 9: Quick One with system-release

$ cat /etc/system-release
Red Hat Enterprise Linux release 9.0 (Plow)

Option 10: cat Offers More
Depending on the cat command, you can get more or less information when you try to verify your version of Red Hat Enterprise Linux.

The below command offers you Red Hat OS version plus provides URL links to Red Hat bug reports and documentation, all right from the terminal.

$ cat /etc/*release
NAME=”Red Hat Enterprise Linux”
VERSION=”9.0 (Plow)
ID=”rhel”
ID_LIKE=”fedora”
VERSION_ID=”9.0
PLATFORM_ID=”platform:el9″
PRETTY_NAME=”Red Hat Enterprise Linux 9.0 (Plow)”
ANSI_COLOR=”0;31″
LOGO=”fedora-logo-icon”
CPE_NAME=”cpe:/o:redhat:enterprise_linux:9::baseos”
HOME_URL=”https://www.redhat.com/”
DOCUMENTATION_URL=”https://access.redhat.com/documentation/red_hat_enterprise_linux/9/”
BUG_REPORT_URL=”https://bugzilla.redhat.com/”

REDHAT_BUGZILLA_PRODUCT=”Red Hat Enterprise Linux 9
REDHAT_BUGZILLA_PRODUCT_VERSION=9.0
REDHAT_SUPPORT_PRODUCT=”Red Hat Enterprise Linux”
REDHAT_SUPPORT_PRODUCT_VERSION=”9.0
Red Hat Enterprise Linux release 9.0 (Plow)
Red Hat Enterprise Linux release 9.0 (Plow

Option 11: uname it
When you want the RHEL version PLUS the running kernel, go with uname -r

$ uname -r
5.14.0-70.22.1.el9_0.x86_64

Option 12: Another uname CLI
With uname -a, you get the OS version plus today’s date, Kernel and the CPU architecture on your system.

$ uname -a
Linux localhost.localdomain 5.14.0-70.22.1.el9_0.x86_64 #1 SMP PREEMPT Tue Aug 2 10:02:12 EDT 2022 x86_64 x86_64 x86_64 GNU/Linux

Option 13: More cat Stuff
Looks like we’re not going to run out of cat options to verify the Red Hat OS version.

$ cat /etc/system-release-cpe
cpe:/o:redhat:enterprise_linux:9::baseos

Option 14:  ls, the Final Method
$ sudo ls /boot/loader/entries | grep el
34cbcd014bc4485799485d4322d9d700-5.14.0-70.13.1.el9_0.x86_64.conf
34cbcd014bc4485799485d4322d9d700-5.14.0-70.22.1.el9_0.x86_64.conf

If you’re a developer you can get access to a free version of Red Hat Enterprise Linux.

Otherwise you’ll have to fork out an annual fee.

Compared to other Linux distros like Ubuntu, familiarity with RHEL OS gives you a better chance of landing a job at a big company or MSP.

Uncomplicated Firewall Stays True to its Name

 Command Line, Linux, Security  Comments Off on Uncomplicated Firewall Stays True to its Name
Sep 032022
 

Having a Ubuntu or Linux Mint desktop without the UFW (short for Uncomplicated Firewall) is like buying a nice home without a front door.

UFW, a host-based netfilter firewall, comes standard with Ubuntu and its derivatives like Linux Mint 21.

The program comes in both CLI and GUI versions.

True to its name, UFW is simple to use and supports both IPv4 and IPv6 addresses.

UFW – Inactive by Default

On a newly installed Linux Mint 21 desktop computer, UFW was bizarrely inactive by default (see below).

$ sudo ufw status
Status: inactive

I don’t understand the logic of Linux Mint developers in providing a firewall that comes disabled by default.

So I set to quickly enable the UFW firewall on Linux Mint 21 with the below command:

$ sudo ufw enable
Firewall is active and enabled on system startup

In contrast to Linux Mint, the firewall on Red Hat Enterprise Linux 9 is enabled by default. On the flip side, the firewall in RHEL 9 is anything but uncomplicated.

When you enable UFW, the program reloads the firewall and enables it on boot

Now when we re-run the status command after adding the verbose option we see that UFW is active and note its default configurations: deny (incoming), allow (outgoing), disabled (routed)

$ sudo ufw status verbose
Status: active
Logging: on (low)
Default: deny (incoming), allow (outgoing), disabled (routed)
New profiles: skip

That is all nice and dandy but what if we want to do more than stick with the defaults.

Block Cat Videos on YouTube

UFW supports both inbound and outbound filtering.

Let’s say you want to block all outbound web traffic on your new employee’s PC (she doesn’t need the Internet for her work).

In that scenario, you’d add the following lines:

$ sudo ufw deny out https
$ sudo ufw deny out http

The above lines will prevent your employee from wasting time looking at cat videos on YouTube during work hours.

By the way, you’ll get the same results by using the Port Numbers 443 and 80 for https and https respectively:

$ sudo ufw deny out 443
$ sudo ufw deny out 80

Lots of Options

There’s plenty of other CLI options that you can tweak in UFW.

You can delete or prepend a rule by its number or by using the actual rule itself.

You can also adjust logging levels, rate-limit connections, do a dry-run feature without actually modiying the rules, reset to installation defaults) and more.

If for some reason, you want to get back to the default install, use the ufw reset command:

$ sudo ufw reset
Resetting all rules to installed defaults. Proceed with operation (y|n)? y
Backing up ‘user.rules’ to ‘/etc/ufw/user.rules.20220902_154828’
Backing up ‘before.rules’ to ‘/etc/ufw/before.rules.20220902_154828’
Backing up ‘after.rules’ to ‘/etc/ufw/after.rules.20220902_154828’
Backing up ‘user6.rules’ to ‘/etc/ufw/user6.rules.20220902_154828’
Backing up ‘before6.rules’ to ‘/etc/ufw/before6.rules.20220902_154828’
Backing up ‘after6.rules’ to ‘/etc/ufw/after6.rules.20220902_154828’

For traffic not destined to the host itself but meant to be routed through the firewall, make sure you prepend route before the rule. So your syntax would lok like:

$ sudo ufw route [Rule}

According to UFW’s man pages, the rate-limit feature kicks in if an IP address tries to initiate 6 or more connections within 30 seconds.

For instance, if you want to rate-limit ssh connections, you’d use:

$ sudo ufw limit ssh/tcp

You can verify the ssh rate-limit you configured above by running:

$ sudo ufw status numbered
Status: active
To Action From
— —— —-
[ 1] 22/tcp LIMIT IN Anywhere
[ 2] 22/tcp (v6) LIMIT IN Anywhere (v6)

Clearly, UFW is a richly featured firewall with plenty of options.

We have barely scratched the surface of UFW’s capabilities in this post.

I’d encourage you to login to your Ubuntu 22.04 or Linux Mint 21 system and check out the man pages of UFW and play around with the various options.

GUI Version of UFW

If you think the CLI version of UFW is no biggie to configure, wait till you see the GUI version, which is appropriately named Gufw Firewall.

It takes just a few seconds to set up. If you’re using Linux Mint 21, go to Menu (bottom-left usually) and search for gufw or firewall.

UFW Uncomplicated Firewall
The GUI version has three profiles: Home, Office and Public.

By default, Outgoing traffic is allowed for all three profiles while Incoming traffic is denied for Public and Office.

Home profile is turned off by default but you can turn it on and pick deny for Incoming traffic IF that is your preference.

UFW Verdict

All in all, UFW is one of the security utilities that make Ubuntu or Linux Mint 21 a worthy desktop Linux distribution.

Unlike the default firewall in RHEL 9 (which uses the concept of zones and a difficult syntax), UFW is easy to use whether in GUI or CLI mode.

I only wish UFW came enabled by default.

Before concluding, I’d like to share a bunch of key UFW commands I found on the firewall’s man pages:

$ sudo ufw –help
Usage: ufw COMMAND

Commands:
enable enables the firewall
disable disables the firewall
default ARG set default policy
logging LEVEL set logging to LEVEL
allow ARGS add allow rule
deny ARGS add deny rule
reject ARGS add reject rule
limit ARGS add limit rule
delete RULE|NUM delete RULE
insert NUM RULE insert RULE at NUM
prepend RULE prepend RULE
route RULE add route RULE
route delete RULE|NUM delete route RULE
route insert NUM RULE insert route RULE at NUM
reload reload firewall
reset reset firewall
status show firewall status
status numbered show firewall status as numbered list of RULES
status verbose show verbose firewall status
show ARG show firewall report
version display version information

Find DNS Server in Linux Mint

 Command Line, Linux  Comments Off on Find DNS Server in Linux Mint
Feb 242021
 

If you’re a networking or sys admin student, you might want to know how to identify the DNS server address of your Linux system on the Command Line.

DNS refers to the Domain Name System, which resolves domain names into IP addresses.

In this case, we’re talking specifically about finding the DNS server on the Linux Mint or Ubuntu desktop via the command line interface.

Identify DNS Server Address via CLI

Here are a few command line tools that should help you identify the DNS server on your Linux Mint system.

I’ve tested the following commands on Linux Mint and Ubuntu.

1. nmcli dev show | grep DNS

$ nmcli dev show | grep DNS
IP4.DNS[1]: 208.67.220.220
IP4.DNS[2]: 208.67.222.222

2. nmcli dev show | grep DNS | sed ‘s/\s\s*/\t/g’ | cut -f 2

$ nmcli dev show | grep DNS | sed 's/\s\s*/\t/g' | cut -f 2
208.67.220.220
208.67.222.222

3. nmcli device show | grep IP4.DNS

$ nmcli device show eno3 | grep IP4.DNS
IP4.DNS[1]: 208.67.220.220
IP4.DNS[2]: 208.67.222.222

4. systemd-resolve –status

You may have to scroll down (press the tab key) to see full output.

systemd-resolve --status
Global
          DNSSEC NTA: 10.in-addr.arpa
                      16.172.in-addr.arpa
                      168.192.in-addr.arpa
                      17.172.in-addr.arpa
                      [output truncated]
         DNS Servers: 208.67.220.220
                      208.67.222.222
          DNS Domain: ~.

Differences between yum info and yumdb info with Example

 Command Line, Linux  Comments Off on Differences between yum info and yumdb info with Example
Apr 262016
 

Wise folks say a picture is worth a thousand words.

In Linux, an example is worth ten thousand words.

In this post, we’ll use an example to understand the difference between the commands yum info and yumdb info.

For purpose of this post, I will use the popular Cherrytree notes application.

In both examples I’ve run the commands after installing cherrytree.

By the way, I’m running the below commands on a CentOS 7 system.

So here we go, first with the yum info command.

yum info

[tommy@localhost ~]$ yum info cherrytree
Loaded plugins: aliases, changelog, fastestmirror, langpacks
Loading mirror speeds from cached hostfile
 * base: linux.cc.lehigh.edu
 * epel: mirrors.mit.edu
 * extras: mirror.vtti.vt.edu
 * updates: mirror.net.cen.ct.gov
Installed Packages
Name        : cherrytree
Arch        : noarch
Version     : 0.36.9
Release     : 1.el7
Size        : 3.1 M
Repo        : installed
From repo   : epel
Summary     : Hierarchical note taking application
URL         : http://www.giuspen.com/cherrytree/
License     : GPLv3+
Description : CherryTree is a hierarchical note taking application, featuring rich text and
            : syntax highlighting, storing all the data (including images) in a single XML
            : file with extension ".ctd".

Now let’s consider yumdb info with the same cherrytree application.

yumdb info

[tommy@localhost ~]$ yumdb info cherrytree
Loaded plugins: fastestmirror, langpacks
cherrytree-0.36.9-1.el7.noarch
checksum_data = febc31650e96f822cb1a4e52c66aa4a9e71503f861680b3fa3385a478300b7ed
checksum_type = sha256
command_line = install cherrytree
from_repo = epel
from_repo_revision = 1461632780
from_repo_timestamp = 1461640240
installed_by = 1000
origin_url = http://ftp.osuosl.org/pub/fedora-epel/7/x86_64/c/cherrytree-0.36.9-1.el7.noarch.rpm
reason = user
releasever = 7
var_infra = stock
var_uuid = 72c6b420-9095-4304-90a7-fbb60a47ec6a
[tommy@localhost ~]$ 

yumdb info provides information like the checksum data and type, command used to install it, the repository and the person (userid) who installed it but nothing about the application or the developer.

However yum info provides information about the application (both in summary form and in a slightly longer version) as well as the file size. But yum info provides no information about the checksum data or type, the command used for installation or the person (userid) who installed it.

So which command you want to use will depend on your unique needs.

How to Change Default Kernel in CentOS 7

 Command Line, Linux  Comments Off on How to Change Default Kernel in CentOS 7
Mar 282016
 

A typical CentOS 7 Linux system has multiple kernels.

How many kernels you have in your CentOS systems depends on the configuration setting.

Sometimes you might feel the need to change the default kernel to a different one (it may be an older or newer kernel) to ensure a particular application runs well.

Here’s how to change the default kernel at boot time.

List Available Kernels

First, let’s list the available kernels on our CentOS 7 system with the following command (you need to be root).

$ sudo egrep ^menuentry /etc/grub2.cfg | cut -f 2 -d \'
CentOS Linux (3.10.0-327.10.1.el7.x86_64) 7 (Core)
CentOS Linux (3.10.0-327.4.5.el7.x86_64) 7 (Core)
CentOS Linux (3.10.0-327.4.4.el7.x86_64) 7 (Core)
CentOS Linux (3.10.0-327.3.1.el7.x86_64) 7 (Core)
CentOS Linux (3.10.0-229.20.1.el7.x86_64) 7 (Core)
CentOS Linux, with Linux 0-rescue-ddf73bd8a3a44950a327a6961955c015

Once you have the kernel list, you can decide which kernel you want as the default boot kernel.

Change Default Kernel

Multiple kernel boot options are available to us in the above list.

Now it’s time to set our preferred boot kernel.

Important – The boot options in the above kernel list start at 0.

So if you want the 3.10.0-229.20.1.el7.x86_64 kernel as the default kernel, note that its boot option will be 4 in the above list.

Now let’s set 3.10.0-229.20.1.el7.x86_64 as our default kernel with the sudo grub2-set-default command.

$ sudo grub2-set-default 4

After changing the default kernel, you must reboot (remember to close all your open applications).

$ sudo reboot

Once the system has come up after reboot, it’s time to check if the default kernel has changed via the uname -r command.

$ uname -r 
3.10.0-229.20.1.el7.x86_64

Voila, changing the default boot kernel in CentOS 7 is as simple as that.

Related Posts
Get Rid of Old Kernels in CentOS 7 and Red Hat 7

How to Shut Down or Reboot Linux from Command Line

 Command Line, Linux  Comments Off on How to Shut Down or Reboot Linux from Command Line
Dec 042015
 

If you love tinkering with Linux, here’s something to pique your interest.

In this post, we’ll look at various methods to shut down or reboot a Linux system via the terminal.

Shutdown, poweroff, and reboot are three commands to shut down or reboot a Linux system.

I recommend you install Oracle’s free Virtualbox virtualization software and then install a guest OS (CentS or Ubuntu) before running the below commands on it to avoid accidentally disrupting important running processes.

Shut Down Linux

There are multiple options to shut down a Linux system on the command line.

Let’s first consider the shutdown and poweroff commands.

You can use the shutdown command to both shut down and reboot a Linux system.

First, we’ll look at the commands to shut down the system and then run through the commands for rebooting.

$ shutdown
Must be root.

As we see above, we need to be root or use sudo to run the shutdown command.

So we’ll run the command again, this time with sudo.

[jason@localhost ~]$ sudo shutdown
[sudo] password for jason: 
Shutdown scheduled for Thu 2015-12-03 21:02:24 EST, use 'shutdown -c' to cancel.
[jason@localhost ~]$ 
Broadcast message from root@localhost.localdomain (Thu 2015-12-03 21:01:25 EST):
The system is going down for power-off at Thu 2015-12-03 21:02:24 EST!

As we note above, the system provides users with advance notice of the impending power-off.

Shut Down Immediately

$ sudo shutdown now

When you run the above command, the system will shut down immediately so make sure you have everything saved and no important processes running.

Delayed Shut Down
Say you want to shut down your Linux system after three minutes.

Here’s the command for that.

[jason@localhost ~]$ sudo shutdown 3
[sudo] password for jason: 
Shutdown scheduled for Thu 2015-12-03 22:55:16 EST, use 'shutdown -c' to cancel.
Broadcast message from root@localhost.localdomain (Thu 2015-12-03 22:53:16 EST):
The system is going down for power-off at Thu 2015-12-03 22:55:16 EST!

You can even specify the exact time for the system to be shut down.

[jason@localhost ~]$ sudo shutdown 11:45
Shutdown scheduled for Fri 2015-12-04 11:45:00 EST, use 'shutdown -c' to cancel.
[jasoni@localhost ~]$ 
Broadcast message from root@localhost.localdomain (Fri 2015-12-04 11:35:27 EST):
The system is going down for power-off at Fri 2015-12-04 11:45:00 EST!

Remember to use 24-hour time for PM (so for a scheduled shut down at 1:35PM you must write sudo shutdown 13:35).

Cancel Shut Down

What if you change your mind. Continue reading »