
Having a Ubuntu or Linux Mint desktop without the UFW (short for Uncomplicated Firewall) is like buying a nice home without a front door.
UFW, a host-based netfilter firewall, comes standard with Ubuntu and its derivatives like Linux Mint 21.
The program comes in both CLI and GUI versions.
True to its name, UFW is simple to use and supports both IPv4 and IPv6 addresses.
UFW – Inactive by Default
On a newly installed Linux Mint 21 desktop computer, UFW was bizarrely inactive by default (see below).
$ sudo ufw status
Status: inactive
I don’t understand the logic of Linux Mint developers in providing a firewall that comes disabled by default.
So I set to quickly enable the UFW firewall on Linux Mint 21 with the below command:
$ sudo ufw enable
Firewall is active and enabled on system startup
In contrast to Linux Mint, the firewall on Red Hat Enterprise Linux 9 is enabled by default. On the flip side, the firewall in RHEL 9 is anything but uncomplicated.
When you enable UFW, the program reloads the firewall and enables it on boot
Now when we re-run the status command after adding the verbose option we see that UFW is active and note its default configurations: deny (incoming), allow (outgoing), disabled (routed)
$ sudo ufw status verbose
Status: active
Logging: on (low)
Default: deny (incoming), allow (outgoing), disabled (routed)
New profiles: skip
That is all nice and dandy but what if we want to do more than stick with the defaults.
Block Cat Videos on YouTube
UFW supports both inbound and outbound filtering.
Let’s say you want to block all outbound web traffic on your new employee’s PC (she doesn’t need the Internet for her work).
In that scenario, you’d add the following lines:
$ sudo ufw deny out https
$ sudo ufw deny out http
The above lines will prevent your employee from wasting time looking at cat videos on YouTube during work hours.
By the way, you’ll get the same results by using the Port Numbers 443 and 80 for https and https respectively:
$ sudo ufw deny out 443
$ sudo ufw deny out 80
Lots of Options
There’s plenty of other CLI options that you can tweak in UFW.
You can delete or prepend a rule by its number or by using the actual rule itself.
You can also adjust logging levels, rate-limit connections, do a dry-run feature without actually modiying the rules, reset to installation defaults) and more.
If for some reason, you want to get back to the default install, use the ufw reset command:
$ sudo ufw reset
Resetting all rules to installed defaults. Proceed with operation (y|n)? y
Backing up ‘user.rules’ to ‘/etc/ufw/user.rules.20220902_154828’
Backing up ‘before.rules’ to ‘/etc/ufw/before.rules.20220902_154828’
Backing up ‘after.rules’ to ‘/etc/ufw/after.rules.20220902_154828’
Backing up ‘user6.rules’ to ‘/etc/ufw/user6.rules.20220902_154828’
Backing up ‘before6.rules’ to ‘/etc/ufw/before6.rules.20220902_154828’
Backing up ‘after6.rules’ to ‘/etc/ufw/after6.rules.20220902_154828’
For traffic not destined to the host itself but meant to be routed through the firewall, make sure you prepend route before the rule. So your syntax would lok like:
$ sudo ufw route [Rule}
According to UFW’s man pages, the rate-limit feature kicks in if an IP address tries to initiate 6 or more connections within 30 seconds.
For instance, if you want to rate-limit ssh connections, you’d use:
$ sudo ufw limit ssh/tcp
You can verify the ssh rate-limit you configured above by running:
$ sudo ufw status numbered
Status: active
To Action From
— —— —-
[ 1] 22/tcp LIMIT IN Anywhere
[ 2] 22/tcp (v6) LIMIT IN Anywhere (v6)
Clearly, UFW is a richly featured firewall with plenty of options.
We have barely scratched the surface of UFW’s capabilities in this post.
I’d encourage you to login to your Ubuntu 22.04 or Linux Mint 21 system and check out the man pages of UFW and play around with the various options.
GUI Version of UFW
If you think the CLI version of UFW is no biggie to configure, wait till you see the GUI version, which is appropriately named Gufw Firewall.
It takes just a few seconds to set up. If you’re using Linux Mint 21, go to Menu (bottom-left usually) and search for gufw or firewall.
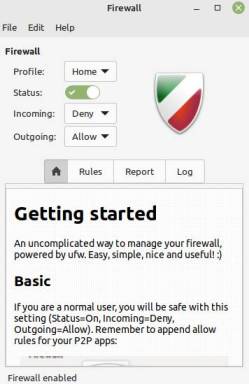
The GUI version has three profiles: Home, Office and Public.
By default, Outgoing traffic is allowed for all three profiles while Incoming traffic is denied for Public and Office.
Home profile is turned off by default but you can turn it on and pick deny for Incoming traffic IF that is your preference.
UFW Verdict
All in all, UFW is one of the security utilities that make Ubuntu or Linux Mint 21 a worthy desktop Linux distribution.
Unlike the default firewall in RHEL 9 (which uses the concept of zones and a difficult syntax), UFW is easy to use whether in GUI or CLI mode.
I only wish UFW came enabled by default.
Before concluding, I’d like to share a bunch of key UFW commands I found on the firewall’s man pages:
$ sudo ufw –help
Usage: ufw COMMAND
Commands:
enable enables the firewall
disable disables the firewall
default ARG set default policy
logging LEVEL set logging to LEVEL
allow ARGS add allow rule
deny ARGS add deny rule
reject ARGS add reject rule
limit ARGS add limit rule
delete RULE|NUM delete RULE
insert NUM RULE insert RULE at NUM
prepend RULE prepend RULE
route RULE add route RULE
route delete RULE|NUM delete route RULE
route insert NUM RULE insert route RULE at NUM
reload reload firewall
reset reset firewall
status show firewall status
status numbered show firewall status as numbered list of RULES
status verbose show verbose firewall status
show ARG show firewall report
version display version information
Sorry, the comment form is closed at this time.