How to Install Packet Tracer Networking Simulator on Linux

 How To, Linux, Networking  Comments Off on How to Install Packet Tracer Networking Simulator on Linux
Mar 312019
 

For anyone starting on the rewarding journey into computer networking, Packet Tracer is an indispensable learning tool.

If you’re planning to take the Cisco Certified Network Associate (CCNA) ) exam, you must practice on the Packet Tracer networking simulation software from Cisco.
Packet Tracer

Download Packet Tracer

On Cisco’s Networking Academy web site, the latest 64-bit version of Packet Tracer is available for both Linux and Windows for free.

So I headed to Cisco’s Packet Tracer Download web site and downloaded the Packet Tracer 7.2.1 tarball for Linux.

Before you can download Packet Tracer, you must register with the site.

For the purpose of this post, I downloaded Packet Tracer 7.2 to a 10-year-old Dell 780 desktop PC running Linux Mint 18.3.

(By the way, I tried the Windows version of Packet Tracer too and got it to work without sweat. Since my Windows 10 laptop is an anemic device with just 4GB RAM, I prefer to run Packet Tracer on my Linux PC, which has a more generous 8GB RAM.)

Extracting the File

I extracted Packet Tracer 7.2.1 into the same folder in which I had downloaded the file.

Now that you have downloaded the Packet Tracer software, fire up your terminal and extract the software (see command below).

mike@familypc ~/Downloads/Packet-Tracer $ tar -xvzf Packet-Tracer-7.2.1-for-Linux-64-bit.tar.gz
art/
art/IoE/
art/IoE/Sensors/
art/IoE/Sensors/MotionSensor.png
art/IoE/Sensors/GenericSensor.png
[output truncated]
templates/Smart LED.ptd
tpl.linguist
tpl.packettracer
mike@familypc ~/Downloads/Packet-Tracer

Now that we completed the extraction, let’s take a quick look at the folder.

mike@familypc ~/Downloads/Packet-Tracer $ ll -a
total 305296
drwxrwxr-x 11 mike mike      4096 Mar 29 20:11 ./
drwxr-xr-x 18 mike mike      4096 Mar 24 16:19 ../
-rw-rw-r--  1 mike mike    710787 Mar 26 22:19 1.2.4.4 Packet Tracer - Help and Navigation Tips.pdf
drwxrwxr-x 24 mike mike      4096 Dec  9 23:45 art/
drwxrwxr-x  6 mike mike      4096 Dec  9 23:45 backgrounds/
drwxr-xr-x  8 mike mike      4096 Dec  7 15:41 bin/
-rw-rw-r--  1 mike mike    172942 Mar 17 17:31 Cisco Packet Tracer FAQs.pdf
-rwxrwxr-x  1 mike mike     14510 Dec 14 20:23 eula721.txt*
drwxr-xr-x 15 mike mike      4096 Dec 10 18:44 extensions/
drwxr-xr-x  3 mike mike      4096 Dec  7 15:27 help/
-rwxr-xr-x  1 mike mike      4134 Dec 14 19:56 install*
drwxrwxr-x  2 mike mike      4096 Dec  9 23:45 languages/
-rw-rw-r--  1 mike mike 311645539 Mar 17 17:31 Packet-Tracer-7.2.1-for-Linux-64-bit.tar.gz
dr-xr-xr-x 21 mike mike      4096 Dec  9 23:45 saves/
-rw-r--r--  1 mike mike      1237 Dec  9 23:45 set_ptenv.sh
-rw-r--r--  1 mike mike      1207 Dec  9 23:45 set_qtenv.sh
drwxrwxr-x  2 mike mike      4096 Dec  9 23:45 Sounds/
drwxrwxr-x  3 mike mike      4096 Dec  9 23:45 templates/
-rw-r--r--  1 mike mike       159 Mar  5  2018 tpl.linguist
-rw-r--r--  1 mike mike       177 Dec  7 15:40 tpl.packettracer
mike@familypc ~/Downloads/Packet-Tracer $

Everything looks good.

So let’s move to the next step: Running the install script.

Installing Packet Tracer

I did not encounter any major issues in installing Packet Tracer except for a minor bump when the process stopped momentarily and asked for my sudo password to copy the files into opt/pt.

mike@familypc ~/Downloads/Packet-Tracer $ ./install

Welcome to Cisco Packet Tracer 7.2.1 Installation

Read the following End User License Agreement "EULA" carefully. You must accept the terms of this EULA to install and use Cisco Packet Tracer.
Press the Enter key to read the EULA.

Cisco Packet Tracer
Software License Agreement

IMPORTANT: PLEASE READ THIS CISCO PACKET TRACER SOFTWARE LICENSE AGREEMENT (THE "AGREEMENT") CAREFULLY.  DOWNLOADING, INSTALLING OR USING THE CISCO PACKET TRACER SOFTWARE CONSTITUTES ACCEPTANCE OF T
HIS AGREEMENT.  IF YOU DO NOT AGREE TO ALL OF THE TERMS OF THIS AGREEMENT, THEN CISCO SYSTEMS, INC. ("CISCO") IS UNWILLING TO LICENSE THE SOFTWARE TO YOU AND YOU ARE NOT AUTHORIZED TO DOWNLOAD, INST
ALL OR USE THE SOFTWARE.
I.	DISTRIBUTION RIGHTS.  The terms in this Section I (Distribution Rights) of the Agreement apply solely to any Cisco Networking Academy instructor, administrator or other person or entity approved in writing by Cisco Systems, Inc. (each, an "Instructor") to distribute and use the Cisco Packet Tracer software and related documentation (collectively, the "Software") in accordance with the terms and conditions of this Agreement.
	[output truncated]
Cisco, Cisco Systems, and the Cisco Systems logo are registered trademarks of Cisco Systems, Inc. in the U.S. and certain other countries.  Any other trademarks mentioned in this document are the property of their respective owners.
Do you accept the terms of the EULA? (Y)es/(N)o

yes
You have accepted the terms to the EULA. Congratulations. Packet Tracer will now be installed.
Enter location to install Cisco Packet Tracer or press enter for default [/opt/pt]: 
Installing into /opt/pt

Not able to create and copy files to /opt/pt
Should we try to gain root access with sudo? [Yn] y
[sudo] password for mike: 
Installing into /opt/pt
Copied all files successfully to /opt/pt

Should we create a symbolic link "packettracer" in /usr/local/bin for easy Cisco Packet Tracer startup? [Yn] y
Type "packettracer" in a terminal to start Cisco Packet Tracer
Writing PT7HOME environment variable to /etc/profile
Writing QT_DEVICE_PIXEL_RATIO environment variable to /etc/profile

Cisco Packet Tracer 7.2.1 installed successfully
Please restart you computer for the Packet Tracer settings to take effect

Voila, Packet Tracer 7.2 is now installed on my Linux Mint PC.

After rebooting the system, I was able to launch Packet Tracer and get it to work without any issues.

To launch Packet Tracer, head to the terminal and just issue the command packettracer:

mike@familypc ~ $ packettracer
Starting Packet Tracer 7.2.1

But if you’re like me and want to do more with less, you can set up an alias by opening the .bashrc file with nano or vim and inserting alias pt=”packettracer” at the end of the file, save and close it. Don’t forget to run source ~/.bashrc so that you don’t have to close the terminal for the new alias to work. The next time you want to launch Packet Tracer, just type pt instead of the longer packettracer on the terminal.

Overall, I did not encounter any showstoppers in the process of downloading, installing or using Packet Tracer 7.2.1 on my Linux PC.

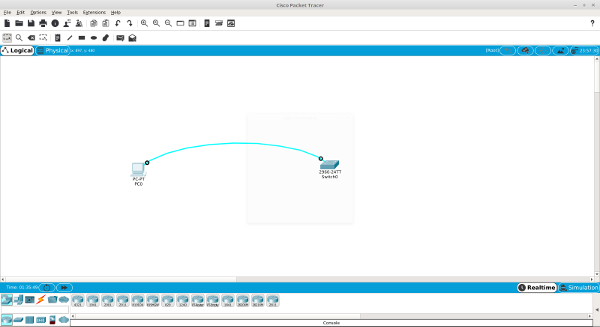
As you can see from the Packet Tracer image at the top of this post, I even moved a PC and switch into the logical work area and hooked them up with a console/rollover cable.

Getting Packet Tracer 7.2 on my Linux desktop PC took about five-minutes.

Since Linux Mint is based on Ubuntu, Packet Tracer should work on Ubuntu too.

One of these days, I’ll test Packet Tracer on my CentOS 7 desktop and see how the process goes.

Should Linux Mint Users Switch to ElementaryOS?

 Linux  Comments Off on Should Linux Mint Users Switch to ElementaryOS?
Feb 142019
 

As a long time Linux desktop user, I’m often tempted to try out new distros to see if any of them can match my current favorite – Linux Mint.

So as part of that experiment, I downloaded ElementaryOS 5.0, which debuted in October 2018, and installed it as a guest OS via VirtualBox.

Like Linux Mint’s latest version (Linux Mint 19.1), ElementaryOS 5.0 aka Juno is also based on Ubuntu 18.04 LTS. This means the distro get extended support, till at least 2022.

At the time of writing this post, ElementaryOS 5.0 has been out for about four months, enough time to iron out any major wrinkles.

Given its larger and happier user base, Linux Mint thrives on voluntary user donations.

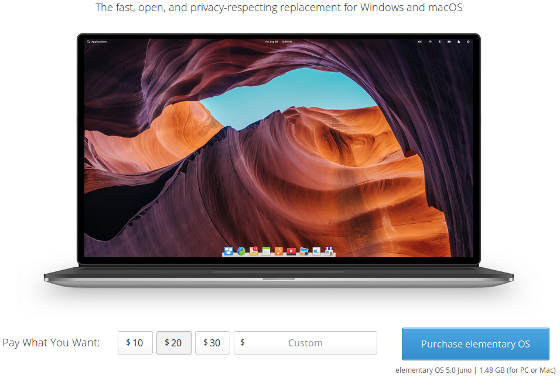
Purchase ElementaryOS 5

Unlike Linux Mint, before download ElementaryOS upfront asks users to “Purchase ElementaryOS” by paying a fee of $10, $20 or $30, or a Custom Amount. However, the fee is not a must and you can still type 0 (as in zero) in the Custom amount box and get the distro for free.

ElementaryOS 5.0 First Impressions
At first glance, ElementaryOS 5.0 has a Mac look-and-feel, particularly with the dock at the bottom-center a la the Mac.

Besides the browser, the dock has icons for Multitasking View, Mail, Calendar, Music, Videos, Photos, System Setting and App Center. I wish the terminal was also included in the dock but it’s not a big effort to add it to the dock.

Unlike Linux Mint, Elementary has gone with the Epiphany aka Gnome Web as its default browser.

After installation, I was pleased to note that I did not experience the screen size issue that still causes pain on some Linux distros (but not Linux Mint) when I run it as a VM on VirtualBox.

Application Downloads
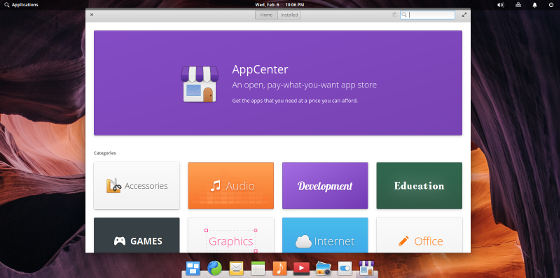
App Center is Elementary’s app store and has applications in a bunch of categories (audio, graphics, Internet, Office, etc.)

ElementaryOS 5 AppCenter

Some categories like Office, Internet, Development have apps divided into two groups: Curated and non-curated apps.

Curated apps can comprise of both paid and unpaid apps.

Although some Curated apps carry a price tag, again users are offered a pay-what-you-want option.

Just to try out the App Center, I downloaded Agenda, a task manager app for making a To-Do list. Default payment listed was $3 but you can pay more, less or even nothing (zero).

Vexing ElementaryOS Issues
Unfortunately, ElementaryOS 5.0 has some serious issues for desktop Linux aficionados.

I just cannot understand the logic of the missing minimize button in ElementaryOS 5.0.

It should have been included as default.

For over 20 years, PC users have been conditioned to expect the minimize button, whether they are in Windows, Mac or Linux desktop environments. When we don’t have one as in Ubuntu or some other distro, we can use the Tweak tool to install a minimize button.

There are, of course, a couple of round about ways to minimize a window in ElementaryOS 5.0. You can do minimize a window by clicking on that app in the dock or by using the Windows key + H.

The second issue is even more bizarre. There’s no Desktop folder and no way to place a file, folder or icon on the desktop.

In ElementaryOS 5.0, the desktop is just a pretty wallpaper image with nothing but the dock at the bottom. That’s it.

Next, the Epiphany browser is not merely sluggish but has limited customization capabilities compared to the default Firefox browser in Linux Mint.

ElementaryOS 5 AppCenterElementaryOS 5 Epiphany Browser

I couldn’t find a way to add plugins to the Epiphany browser although I checked the box for Add Plugins in the browser’s Preferences.

Also, even after checking the “Try to Block Advertisers” box in Epiphany’s Preferences, some ads squeaked through.

By the way, if you’re looking for a way to whitelist on your favorite web sites you’re out of luck. There’s no way to do it.

There are a few other niggling issues, nothing serious but a bit irritating. For instance, Linux Mint has been offering the extremely useful command line system information utility Inxi by default for at least a couple of years. This is not so in ElementaryOS 5.0 although you can install it.

Overall, ElementaryOS looks slick but has miles to go before it can match the sophistication of Linux Mint.

Perhaps, there’s a reason this distro is called ElementaryOS.

I cannot imagine any long-time Linux Mint user will be pleased with ElementaryOS 5.0

Until I find a better Linux desktop distro, I will stick with Linux Mint.

How to Simplify User Management in CentOS 7

 Linux  Comments Off on How to Simplify User Management in CentOS 7
Dec 192018
 

Of course, you can add, modify or delete users and groups on a CentOS 7 system via the command line.

You can even set the default shell, create Sudo users (by adding the user to the Wheel group), set account expiration and password policies like password aging reminder to change password through various command line tools (such as useradd, userdel, groupadd, groupdel, chage etc.).

But if you are not comfortable with the command line, you can accomplish most user management tasks on CentOS 7 via a GUI tool called system-config-users.

Unfortunately, system-config-users does not come pre-installed on CentOS 7.

However, you can easily install system-config-users via the command line as we will show below.

First, let’s get some basic information on system-config-users via the yum info command.

[thomas@localhost ~]$ yum info system-config-users
Available Packages
Name        : system-config-users
Arch        : noarch
Version     : 1.3.5
Release     : 4.el7
Size        : 337 k
Repo        : base/7/x86_64
Summary     : A graphical interface for administering users and groups
URL         : https://than.fedorapeople.org/system-config-users
License     : GPLv2+
Description : system-config-users is a graphical utility for administrating users and groups.  It depends on the libuser library.

Now that we have an idea of what system-config-users can do, let’s go ahead and install the GUI tool.

[thomas@localhost ~]# sudo yum install system-config-users
Resolving Dependencies
--> Running transaction check
---> Package system-config-users.noarch 0:1.3.5-4.el7 will be installed
[output truncated] 
Installed:
  system-config-users.noarch 0:1.3.5-4.el7                                                                                                                                      
Dependency Installed:
  system-config-users-docs.noarch 0:1.0.9-6.el7

That’s it.

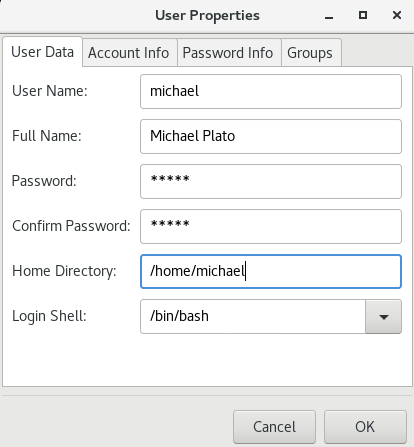
system-config-users GUI user management tool for CentPS 7

To access the GUI user management tool, just type system-config-users on the command line and a pop-up window will open (see above) that’ll allow you to add, modify and delete users and groups effortlessly.

How to Install & Use KVM Virtualization on CentOS 7.5

 Linux, Virtualization  Comments Off on How to Install & Use KVM Virtualization on CentOS 7.5
Dec 042018
 

If you want to learn virtualization, there are many avenues.

You can use Oracle VirtualBox, VMWare, KVM, Xen, HyperV, etc.

Since I was already familiar with other virtualization routes like Oracle VirtualBox, VMWare and HyperV, I decided to take the KVM plunge.

KVM stands for Kernel-based Virtual Machine and has been around since early 2007.

Before diving into KVM, first check if your CPU supports VT features in virtualization (Intel VT or AMD-V)

Use the below command to find whether your CPU supports VT features.

$ egrep '(vmx|svm)' /proc/cpuinfo
flags		: fpu vme de pse tsc msr pae mce cx8 apic sep mtrr pge mca cmov pat pse36 clflush dts acpi mmx fxsr sse sse2 ss ht tm pbe syscall nx lm constant_tsc arch_perfmon pebs bts rep_good nopl aperfmperf eagerfpu pni dtes64 monitor ds_cpl vmx smx est tm2 ssse3 cx16 xtpr pdcm sse4_1 xsave lahf_lm tpr_shadow vnmi flexpriority dtherm

As we can see from the above output, my CentOS 7.5 system has vmx.

So I’m good to go with KVM.

To manage the KVM virtual machines, I went ahead and installed the open source Virt Manager GUI for KVM.

Besides KVM, Virt-Manager is also said to support Xen and LXC (Linux Containers).

Here are the commands I used to install KVM on my CentOS 7.5 system.

$ sudo yum install -y qemu-kvm qemu-img virt-manager libvirt libvirt-python libvirt-client virt-install virt-viewer

Package 10:qemu-kvm-1.5.3-156.el7_5.5.x86_64 already installed and latest version
Package 10:qemu-img-1.5.3-156.el7_5.5.x86_64 already installed and latest version
Package bridge-utils-1.5-9.el7.x86_64 already installed and latest version
Resolving Dependencies
--> Running transaction check

[output truncated]

Good, you’ve now got KVM installed. It’s time to test it.

So I went and downloaded the lightweight Lubuntu 18.04.1.

If you’re on the Gnome 3.28 desktop, go to Applications—>System Tools—>Virtual Machine Manager.

This will open the Virtual Machine Manager and allow you to add whatever virtual machine you want to KVM.

I quickly attached Lubuntu 18.04.1 to KVM through the Virtual Machine Manager.

KVM with VM Lubuntu Attached

Voila, that’s it.

I was delighted that I had added one more item to my virtualization jewel-box.

The whole process of installing KVM and adding/updating Lubuntu took less than 15 minutes.

By the way, the above KVM installation was tested on CentOS 7.5 (kernel 3.10.0-862.11.6) running on an old Dell Optiplex 780SFF.

Useful Resources:
KVM
KVM on Wikipedia
Virt Manager

Fedora 29 KDE Plasma – First Impressions

 Linux  Comments Off on Fedora 29 KDE Plasma – First Impressions
Nov 022018
 

Although my go-to Linux distros are CentOS and Linux Mint, I occasionally give Fedora a spin.

So when Fedora 29 debuted on October 30, 2018, I decided to take the upgrade out for a spin.

Fedora 29 KDE PlasmaFedora 29 KDE Plasma

Fedora is always about choice and, besides the default GNOME 3.3 desktop version, comes in various desktop “spins” like KDE Plasma, XFCE, LXQT, Mate-Compiz, Cinnamon, LXDE and SOAS.

Since I’m not a great fan of GNOME, I opted for the KDE Plasma spin with which I’d had a better experience in the past compared to GNOME.

I downloaded the KDE Plasma iso on my Linux Mint PC, did a shasum verification check of the iso download, wrote the OS to an USB drive and then installed it on an old Dell 780 SFF PC (just for the heck of it, I also installed it as a guest OS via VirtualBox on a different PC but it was a trifle slow).

First Impressions

There were no hiccups with the installation of Fedora 29 KDE Plasma spin although I did it on an anemic PC.

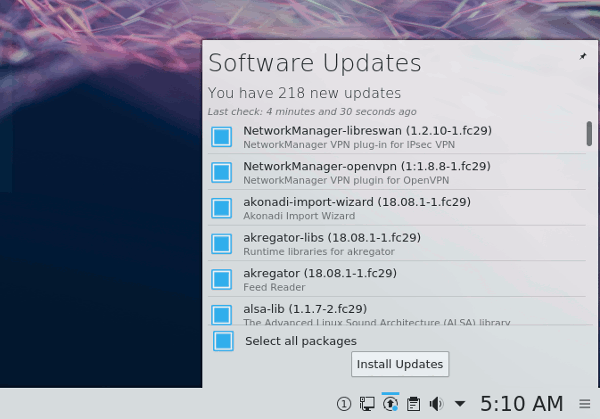
Three days after Fedora 29’s launch on October 30, there were 218 updates waiting for me during my install on November 2.

So many updates just three days after launch? I found this puzzling. What gives??

You can update the system through the command line or via the update button in the bottom right corner of the screen (see image below).

Fedora 29 Software UpdatesFedora 29 Software Updates

At install, the kernel in Fedora 29 KDE Plasma was 4.18.16.

[pasha@localhost ~]$ uname -r
4.18.16-300.fc29.x86_64

Simple tasks that are aggravating on GNOME are easy on Fedora 29 KDE Plasma. For instance, I did not encounter the screen resolution issue a lot of people face while installing a GNOME desktop as a guest OS on VirtualBox or the irritating hot-left corner issue. Also, adding shortcuts to the bottom panel or desktop is simple (right-click the application and select from among the various options).

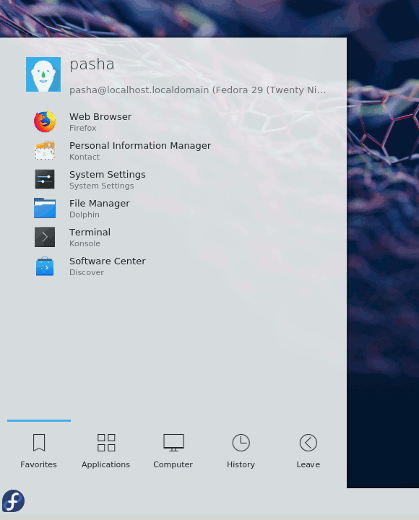
Most tasks like launching an application, adding new software or shutting down or rebooting the system can be accomplished by clicking Fedora’s prominent F icon at the bottom left of the screen and then selecting from the options.

Fedora 29 Application Launch OptionsFedora 29 Application Launch Options

Installing new applications is a breeze via the GUI-based Software Center. There are tons of applications in several categories. But do take some time and research the application before installing it.

The integrated Kontact personal information manager is bound to be very useful.

Another highlight of the upgrade is a so-called Modularity feature. For average users, it may not be that big a deal but for developers and businesses that live by application compatibility and system stability it might be a useful tool.

Here’s how Fedora developers describe the new Modularity feature, which is available on all variations of Fedora 29:

Modularity lets us ship different versions of packages on the same Fedora base. This means you no longer need to make your whole OS upgrade decisions based on individual package versions. For example, you can choose Node.js version 8 or version 10, on either Fedora 28 or Fedora 29. Or you can choose between a version of Kubernetes which matches OpenShift Origin, and a module stream which follows the upstream.

Baffling Issues

Choice is good. But too much of it is confusing.

What is the point of including three browsers (Firefox, Falkon and Konqueror) in Fedora 29 KDE Plasma?

Also, I was disappointed not to find the excellent LibreOffice suite.

Fedora 29 KDE Plasma comes with Calligra Words, which is no patch on LibreOffice Writer.

Some system settings are not as intuitive as they should be. I could not easily find a way to disable the system suspension feature after stepping away for just a few minutes (look under System Settings–>Workspace–>Desktop Behavior–>Screen Locking).

Responsive

Fedora 29 KDE Plasma was responsive even on a decade-old Dell Optiplex 780 SFF machine with 4GB of RAM and a regular spinning hard-drive (not the new SDDs).

In a time when Windows 10 has proven to be a privacy bugaboo and updates nightmare, and Mac prices are shooting through the roof with little innovation to show, Fedora 29 KDE Plasma is a blessing its shortcomings notwithstanding.

Take Fedora 29 KDE Plasma out for a spin. You might even make it your default, go-to desktop OS.

For the moment, I’ll stick to Linux Mint Cinnamon and CentOS 7 GNOME (not a happy camper though) as my Linux desktop OS.

10 Key IP Commands on CentOS 7 & RedHat 7

 How To, Linux  Comments Off on 10 Key IP Commands on CentOS 7 & RedHat 7
Sep 232018
 

Getting a good handle on IP commands will prove useful if you’re managing a Linux box.

Although ifconfig was deprecated and replaced with ip several years ago, some folks sill use ifconfig.

But it’s good to be aware of the basic ip commands when you’re managing a Linux server.

Here are a bunch of IP commands that were tested on my CentOS 7 box. They should work on a RedHat 7 system too.

1. How to Display IP Addresses

To see the IP addresses on your system and various interfaces, use the ip addr command.

[thomaspc@localhost ~]$ ip addr
1: lo:  mtu 65536 qdisc noqueue state UNKNOWN group default qlen 1000
    link/loopback 00:00:00:00:00:00 brd 00:00:00:00:00:00
    inet 127.0.0.1/8 scope host lo
       valid_lft forever preferred_lft forever
    inet6 ::1/128 scope host 
       valid_lft forever preferred_lft forever
2: enp0s25:  mtu 1500 qdisc pfifo_fast state UP group default qlen 1000
    link/ether 00:25:64:d4:d7:ca brd ff:ff:ff:ff:ff:ff
    inet 10.0.1.50/24 brd 10.0.1.255 scope global noprefixroute dynamic enp0s25
       valid_lft 57035sec preferred_lft 57035sec
    inet6 fe80::e64d:5dda:2def:dfbe/64 scope link noprefixroute 
       valid_lft forever preferred_lft forever
3: virbr0:  mtu 1500 qdisc noqueue state UP group default qlen 1000
    link/ether 52:54:00:13:72:5b brd ff:ff:ff:ff:ff:ff
    inet 192.168.122.1/24 brd 192.168.122.255 scope global virbr0
       valid_lft forever preferred_lft forever
4: virbr0-nic:  mtu 1500 qdisc pfifo_fast master virbr0 state DOWN group default qlen 1000
    link/ether 52:54:00:13:72:5b brd ff:ff:ff:ff:ff:ff
7: vnet0:  mtu 1500 qdisc pfifo_fast master virbr0 state UNKNOWN group default qlen 1000
    link/ether fe:54:00:ed:b0:ce brd ff:ff:ff:ff:ff:ff
    inet6 fe80::fc54:ff:feed:b0ce/64 scope link 
       valid_lft forever preferred_lft forever

Let’s next examine how to check for information only on a particular interface.

2. Display Information for a Specific Interface

The below command will display information only on a particular interface.

[thomaspc@localhost ~]$ ip addr show dev enp0s25
2: enp0s25:  mtu 1500 qdisc pfifo_fast state UP group default qlen 1000
    link/ether 00:25:64:d4:d7:ca brd ff:ff:ff:ff:ff:ff
    inet 10.0.1.50/24 brd 10.0.1.255 scope global noprefixroute dynamic enp0s25
       valid_lft 56947sec preferred_lft 56947sec
    inet6 fe80::e64d:5dda:2def:dfbe/64 scope link noprefixroute 
       valid_lft forever preferred_lft forever
3. Show Various Network Interfaces

The ip link command provides information on the state of different network interfaces.

[thomaspc@localhost ~]$ ip link
1: lo:  mtu 65536 qdisc noqueue state UNKNOWN mode DEFAULT group default qlen 1000
    link/loopback 00:00:00:00:00:00 brd 00:00:00:00:00:00
2: enp0s25:  mtu 1500 qdisc pfifo_fast state UP mode DEFAULT group default qlen 1000
    link/ether 00:25:64:d4:d7:ca brd ff:ff:ff:ff:ff:ff
3: virbr0:  mtu 1500 qdisc noqueue state UP mode DEFAULT group default qlen 1000
    link/ether 52:54:00:13:72:5b brd ff:ff:ff:ff:ff:ff
4: virbr0-nic:  mtu 1500 qdisc pfifo_fast master virbr0 state DOWN mode DEFAULT group default qlen 1000
    link/ether 52:54:00:13:72:5b brd ff:ff:ff:ff:ff:ff
7: vnet0:  mtu 1500 qdisc pfifo_fast master virbr0 state UNKNOWN mode DEFAULT group default qlen 1000
    link/ether fe:54:00:ed:b0:ce brd ff:ff:ff:ff:ff:ff

The ip link command can also be used to get an interface online or offline.

4. How to Add an IP Address

The below command will show you how to add an IP address using the ip addr command.

[thomaspc@localhost ~]$ ip addr add 192.168.0.77/24 dev enp0s25

The above command adds address 192.168.0.77 with netmask 24 to device enp0s25

5. How to Delete an IP Address

With the ip addr del command, deleting an IP address is simple.

[thomaspc@localhost ~]$ ip addr del 192.168.0.77/24 dev enp0s25
6. How to bring a Network Interface Up?

Learning how to bring a network interface up is essential for a Linux system administrator.

[thomaspc@localhost ~]$ sudo ip link set em1 up

The above command will bring enp0s25 online.

7. How to bring a Network Interface Down?

There might be occasions when you need to bring a network interface down on our CentOS 7 system.

For such situations, go with the following command.

[thomaspc@localhost ~]$ sudo ip link set enp0s25 down

The above command will take enp0s25offline.

You can check if the interface enp0s25 has been taken offline via the following command:

[thomaspc@localhost ~]$ ip addr show enp0s25
enp0s25:  mtu 1500 qdisc pfifo_fast state DOWN group default qlen 1000
    link/ether 00:25:64:d4:d7:ca brd ff:ff:ff:ff:ff:ff
    inet 10.0.1.50/24 brd 10.0.1.255 scope global noprefixroute dynamic enp0s25
       valid_lft 79017sec preferred_lft 79017sec

As you see from the above output, the network interface enp0s25 is indeed down.

8. How to Check the Routing Table?

You can use ip route show to check the routing table (previously, you were likely using the route command.

[thomaspc@localhost ~]$ ip route show
default via 10.0.1.1 dev enp0s25 proto dhcp metric 100 
10.0.1.0/24 dev enp0s25 proto kernel scope link src 10.0.1.50 metric 100 
192.168.122.0/24 dev virbr0 proto kernel scope link src 192.168.122.1
9. How to Add a Route?

Now, let’s look at how to add an entry to the routing table.

[thomaspc@localhost ~]$ ip route add 192.168.3.0/24 dev enp0s25
10. How to Delete a Route?

To delete an entry from the routing table, run the below command.

[thomaspc@localhost ~]$ ip route del 192.168.3.0/24 dev enp0s25